Vizwall
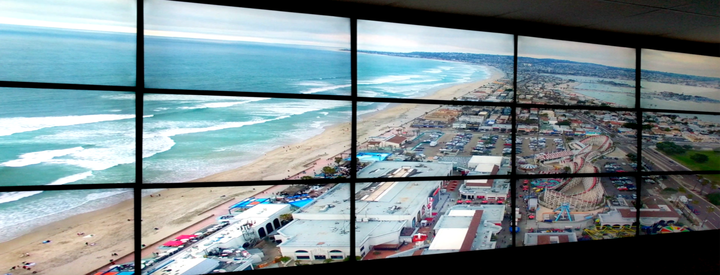 15 screen Vizwall
This project was a long time coming and in fact something that I have been waiting to get my hands on. This project write up is basically about the proof of concept work that I had to do in order to build a final 27 screen vizwall at NYU CUSP for the Urban Observatory project. In this post, I will mention things that work and the gotcha’s that I came accross, and learned about, the hard way..
Problem
At NYU CUSP, We had a room walled on 3 sides and floor to ceiling glass door + window on the other side. The size of the two shorter walls were something like 6ft x 10ft (height) and the longer wall was ~15ft x 10ft (height). We wanted to turn this into a vizwall that would cover all of the wall-space. (check the banner image) A quote for a 3 x 3 configuration commercial vizwall was something ~$2000+ (mind you, not including the TV!). Now, I worked for a couple of university research projects so money is not something we had in abundance. I had to come up with some solution that would keep the price low and still be able to play videos and project images (also, it needs to be configurable so that other researchers can interact with this vizwall to showcase their project).
Solution
Slap a Pi behind each TV screen and use broadcasting/multicasting with PiWall libraries!
Disclaimer:
- The following solution has been tested only using Pi 2B+, Pi 3B and Pi 3B+.
- While the solution is not specific to Pi’s and you can use any cheap Linux machine that is somehwat powerful (check the softwares that needs to run on Pi), this was the cheapest and reliable-ish option in my opinion.
This solution was not one of those, where you would simply plug in the Pi and everything would “just work”. Heck, do things ever?
Hardware Required
Here is the list of hardware that you will need in order to build this project:
- X number of TV screens or Monitors.
- X client Raspberry Pi’s (either Pi 2B+, 3B or 3B+). (We purchased 27 Rpi 3B)
- 1 Master Raspberry Pi (3B, preferably 3B+). (We purchased 3 Pi 3B+ because our vizwall is split into two 6 and one 15 screen display)
- 1 X+1 port ethernet switch (We purchased one 16 port Netgear GS316 and 2 x 8 Port Netgear GS108)
- 1 WiFi capable switch. (I had an existing Asus WiFi switch)
- A Linux/ Mac laptop to perform initial setup for all the Pis.
- You will also need Memory cards to go with all the Pis. Make sure to buy at least an 8GB Class 10 micro SD card. (We used Sandisk 16GB)
- X+1 Ethernet cables to connect the Pi’s and your laptop to the switch.
Note:
- I will be controlling the Master Pi via WiFi. Please make sure to check the number of ports that will be required by you.
Getting Started
Setting up the Pis.
You need to flash the memory cards with the most recent version of Raspbian Desktop. Once downloaded, I made the following changes:
-
Open terminal and type
sudo raspi-config- Change the hostname
- Change password
- Enable ssh
- Change Ram/ GPU memory split to 256
-
Change screen resolution (if required):
- Click on start > Preferences > Raspberry Pi Configuration.
- Click on the “Set Resolution” and select
DMT mode 82 1920x1080
-
Hide the taskbar after Pi boots up
-
Click on start > panel settings > advanced
-
Set
hide when inactiveandpixel size= 0 -
Open new terminal and type
crontab -eand add@reboot sleep 10 && env DISPLAY=:0 XAUTHORITY=/home/pi/.Xauthority /usr/bin/xdotool mousemove 500 500and save it. -
Next, type
nano ~/.config/lxsession/LXDE-pi/autostartand add@unclutter -idle 0I know we haven’t install xdotool and unclutter yet, lets just get the configuration out of the way, we will install it after we setup the networking
-
-
Remove unwanted packages from the Pi (this may not be required with newer versions of Raspbian):
- Open terminal and type
sudo -i - Next type
apt purge libreoffice wolfram-engine sonic-pi scratch -y && apt autoremove -y && apt update -y && apt upgrade -y
- Open terminal and type
-
Backup measure for hiding the taskbar
- In this, we will move the cursor programmatically away from taskbar
-
Reboot the Pi:
sudo reboot now -
Setting up the Network Configuration:
-
Add the WiFi configuration to the Master Pi only (you can add this to clients too if you want).
- Open
/etc/wpa_supplicant/wpa_supplicant.confand add:
network={ ssid="<your wifi name>" psk="<your super secret WiFi password>" } - Open
-
Add the network configuration to
/etc/network/interfacesfile:auto eth0 iface eth0 inet static address 192.168.1.X netmask 255.255.255.0 gateway 192.168.1.1 broadcast 192.168.1.255 ##### # This is required for Master, Optional for clients allow-hotplug wlan0 iface wlan0 inet dhcp wireless-power off wpa-conf /etc/wpa_supplicant/wpa_supplicant.conf ##### up route delete default up ip route add default via 192.168.100.1 dev wlan0 up route add -net 224.0.0.0 netmask 240.0.0.0 eth0I am using 192.168.1.0/24 subnet for one ethernet switch and 192.168.100.0/24 for WiFi switch Change the settings to your liking, but keep it consistent for all the Pi’s that will be connected to same switch
-
-
Next, we’ll install some necessary packages:
- In the same terminal type:
apt install xdotool unclutter xscreensaver libegl1-mesa-dev -y
- In the same terminal type:
-
Disable screensaver:
- Start > Preference > XScreensaver > disable screensaver
-
Install the PiWall libraries (Only Client Pis):
- (Open terminal and type)
mkdir -p ~/devel/piwall && cd ~/devel/piwall wget http://dl.piwall.co.uk/pwlibs1_1.7_armhf.deb && wget http://dl.piwall.co.uk/pwomxplayer_20130815_armhf.debdpkg -i pwlibs1_1.7_armhf.deb && dpkg -i pwomx*
- (Open terminal and type)
-
Creating PiWall configuration file (Only Client Pis):
Checkout the sample setup for a 5 x 3 vizwall:
-
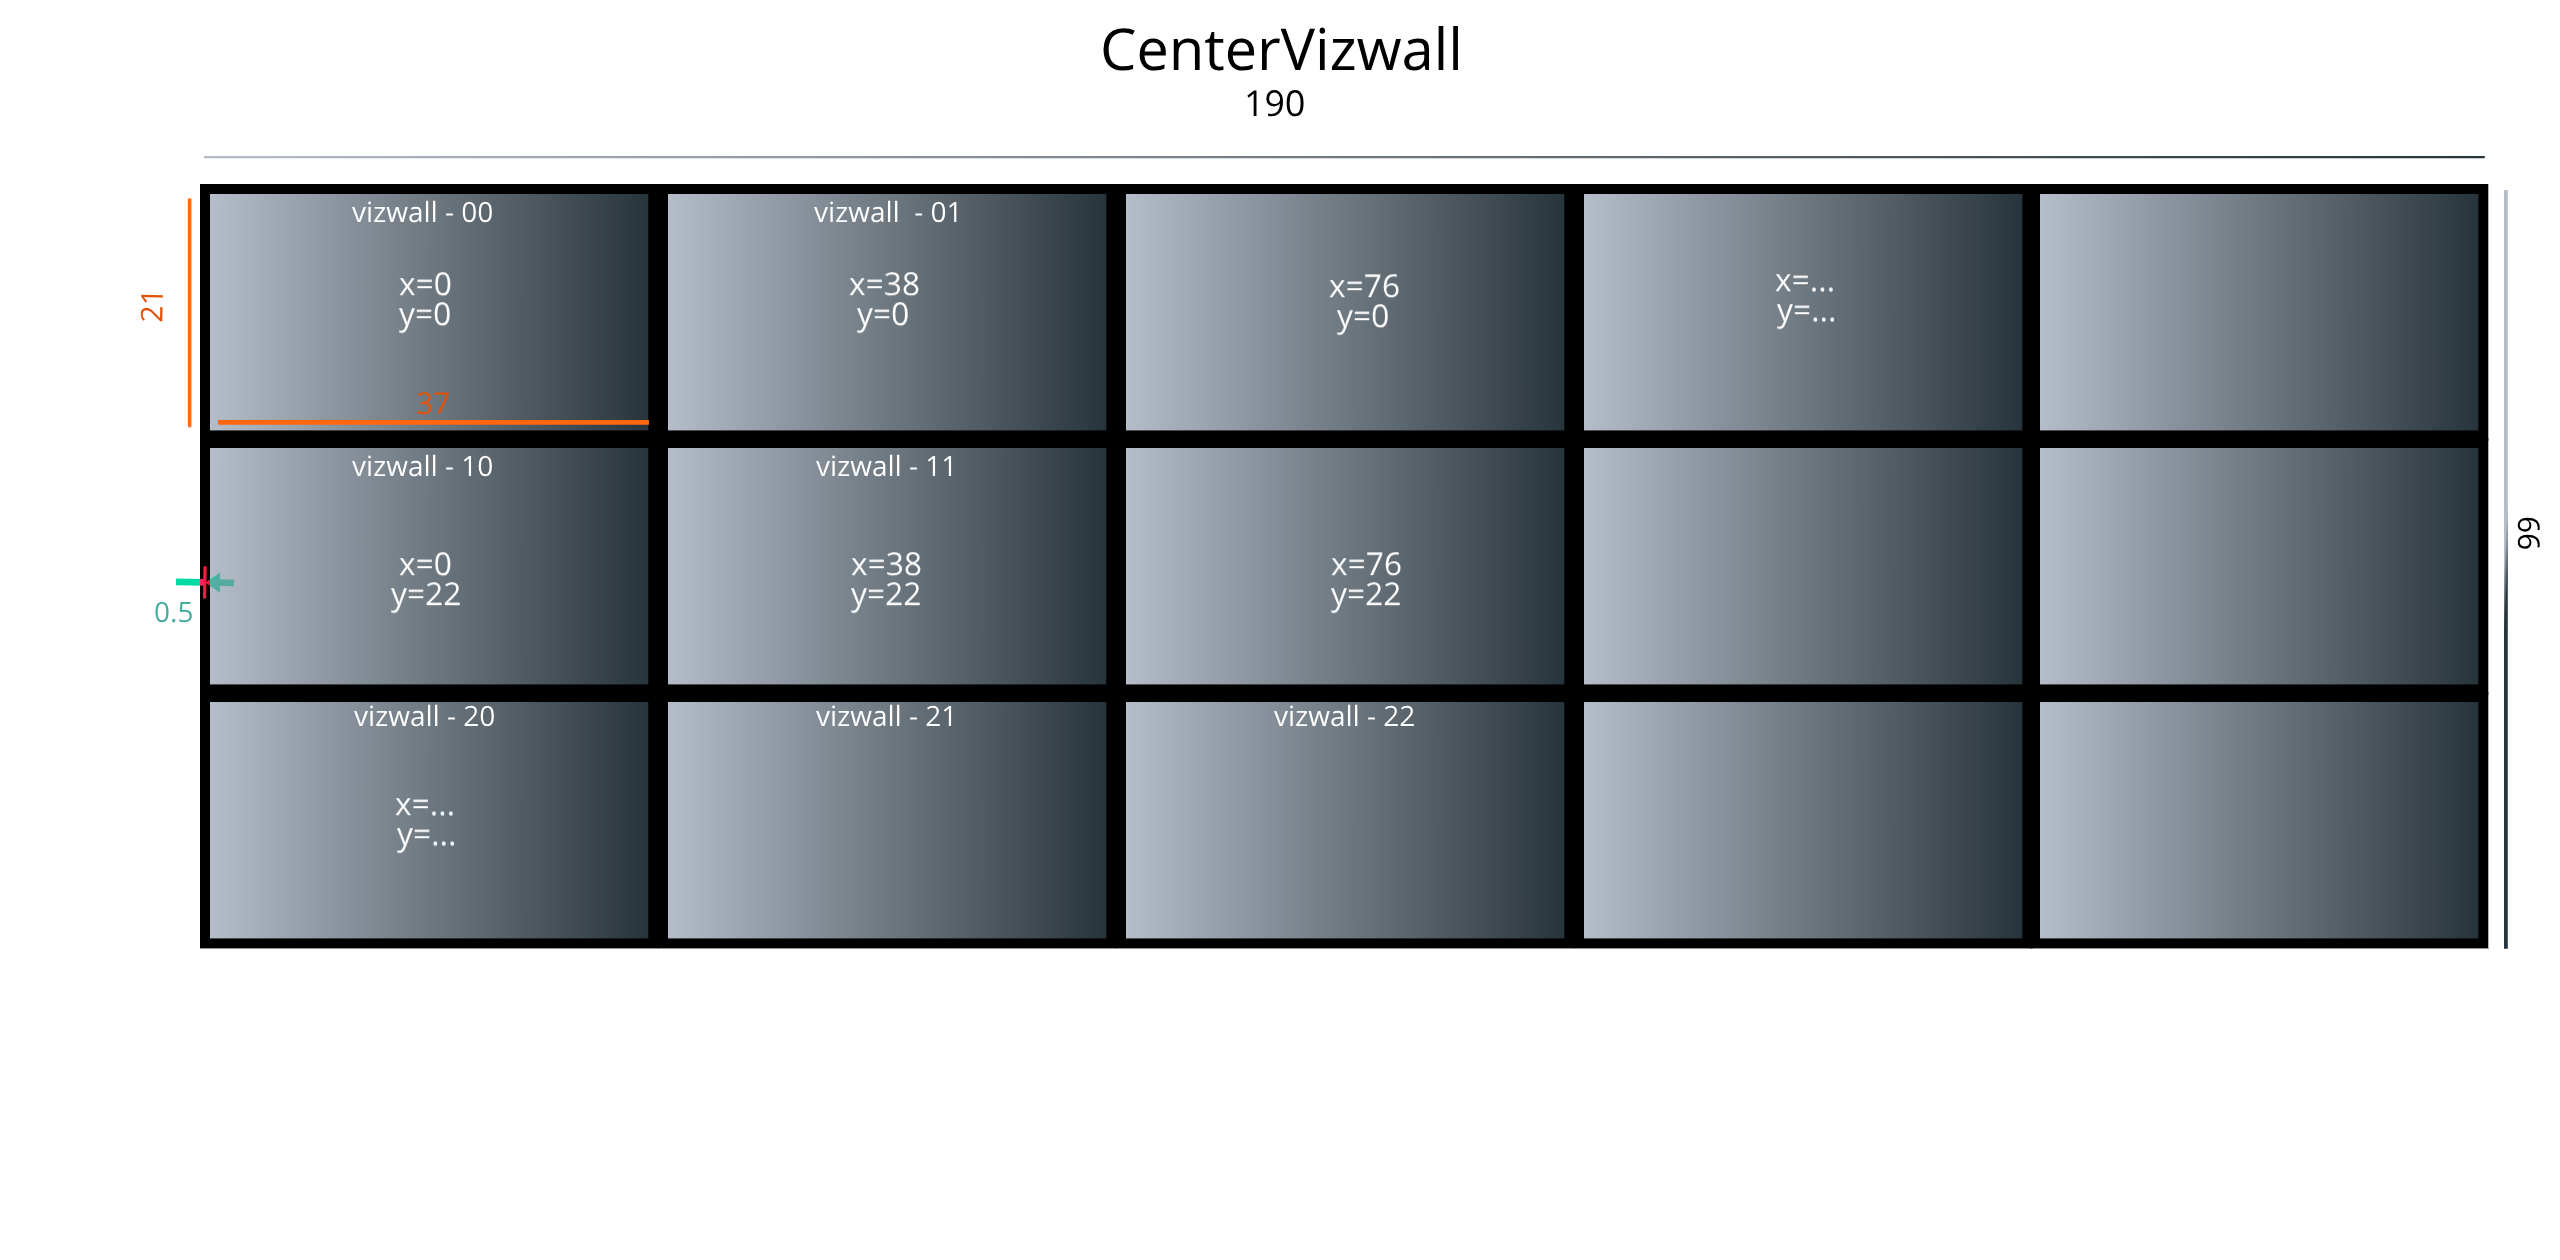
A sample PiWall configuration file looks like this:
[centervizwall] width=190 height=66 x=0 y=0 # Corresponding tile definitions [vizwall-00] wall=centervizwall width=37 height=21 x=0 y=0 [vizwall-01] wall=centervizwall width=37 height=21 x=38 y=0 [vizwall-02] ... ... -
In the first section, we define the vizwall.
- we name the vizwall. I am calling it centervizwall, you can call it whatever you like.
- Next, we specify total width and height of the vizwall. Select whatever units you want but keep it persistent. I chose inches.
- Finally, specify the x and y position values for this vizwall.
In my case, the vizwall starts at
x=0,y=0.
-
From the second section onwards, we define the Screens and their positions
- For convinience, I’m naming my vizwall tiles as vizwall-AB where A is the row and B is the column location.
- Next, I specify the width and height of the screen NOT including the bezels
- Finally, I specify their location. The first screen will start at
x=0,y=0, the screen next to it will start atx=0+<width of screen>+<bezel width>andy=0. Similarly screen below it will start atx=0andy=0+<height of screen>+<bezel height>
-
Save this configuration inside
.piwallfile in your home directory.You can find my configuration file for a 15 screen vizwall here: https://gist.github.com/Mohitsharma44/b82562bc824fbd85670661a5aa18a7f7
-
-
Creating Pitile (Only Client Pis): Finally, we will create a
.pitilefile with contents as the name of the screen (as mentioned in the above configuration file)-
Open terminal and type
nano .pitileand add[tile] id=vizwall-AB
-
-
Installing raspi2png for capturing screenshots
curl -sL https://raw.githubusercontent.com/AndrewFromMelbourne/raspi2png/master/installer.sh | bash - -
Installing FFMPEG (Only Master Pi)
- Download the FFMPEG binaries for Pi
- Copy this file to
/usr/local/bin:sudo cp ffmpeg-release-armhf-32bit-static /usr/local/bin - Uncompress the downloaded file and add executable bit:
cd /usr/local/bin
sudo tar xf ffmpeg-release-armhf-32bit-static.tar.xz
sudo chmod +x ffmpeg
Streaming Videos
Proof of Proof of concept
When I started out with the proof of proof of concept (not a typo, no!), I had to prove myself that this is even feasible. I decided to run this test on a 2 x 2 screen at first.
So then Everything works?
Short answer: Yes; Long answer: No.
Why yes? Because if all you need to do is play a small-ish video (think ~10 minute full HD video), you’re good to go.
There are couple of points to remember when streaming videos:
- The videos should have a max resolution of 1920 x 1080 (no 2K or 4K) at 30Hz. You may be able to get away with 60Hz but Pi 2B+ and Pi 3B may need some overclocking but honestly, if you’re planning to have Pi’s be on 24 x 7 (as I am), I would strictly advise against overclocking.
- Use ffmpeg on Master Pi for streaming the videos. I haven’t had luck using other streamers. YMMV.
How to run it?
On all the Client Pis, you need to start the pwomxplayer to listen for video
stream on a particular port:
pwomxplayer -A udp://239.0.1.23:1234?buffer_size=1200000B > /dev/null 2>&1 &
On the master Pi, start streaming a video.
ffmpeg -analyzeduration 0 -re -i test.mp4 -vcodec copy -f avi -an udp://239.0.1.23:1234
(If you don’t have a sample video, download one of the public test videos from here)
Make sure videos are 1920 x 1080 @30Hz resolution.
Thats it, you should start seeing the video playback on the Pis.
Now, for the long answer: Why No? Well, if you want to play those videos in a loop, the client Pis will freeze after a certain amount of playback. While these client Pis remain responsive for SSH connections and other traffic, they just cannot display the streams.
Honestly, I haven’t figured yet why that happens but I’ve observed this to happen when the total bytes received by the client Pis are just greater than 4GB. This is actually a well known issue. Check this google groups discussion from 2017. Resolving this issue could’ve taken me days if not weeks and time was of essence during that time. So instead, I chose a workaround.
When the video stream finishes, all the client Pis take a screenshot of whatever it is on their screen and display that while the stream receiver script restarts in the background. Once the receiver script starts on the client Pis, the screenshot is removed and the video is displayed again. All of this happens is supposed to happen in a seamless fashion; (More on this in Scripts section)
Why not just use WiFi?
I wanted to have a truly wireless setup (why not, right?). I connected the master and client Pis over WiFi network.
Needless to say, the Packet drops were significant. The issue was not the WiFi switch, but its the inherent limitation of the Pi 2 and 3’s WiFi speed. I also tried using external WiFi NIC cards but then there I was restricted by the USB speed.
Combination of WiFi and Ethernet
After alot of unsuccessful tweaks, I decided on using ethernet cables for all of the communication and data streaming from Master to the clients and use WiFi to control the Master Pi and the result? Checkout the video below for a full 15 screen vizwall
Scripts
Now that we have tested that everything is working, we will script a couple of things:
- To solve for the problem where Pis cannot display past a 4GB limit
- To stream different videos on different group of screens
I am assuming you have shorter videos (~ < 10mins). As mentioned above, we will be creating a script for displaying streams, then running the hack where we take screenshot of whatever is displayed on the screen while restarting receiver in the background.
All of this will be controlled from the Master Pi. Write the following scripts on the Master Pi
- Script to run on client Pis for listening to the ffmpeg stream
- Script for running hack (taking screenshot)
- Sample piwall file (for all 15 screens)
- Copying scripts to the Client pis
- Running (existing) scripts on remote machines
- Running videos on loop from Master Pi
Make sure you have all the above scripts in your home directory (or change the path inside the above scripts). You are just 2 steps away from getting your vizwall running!
First, run the prep.sh script which will copy the files and set proper vizwall
configuration. Finally, run the loop.sh script to start playing the video!
To stream different videos on different group of screens, modify the piwall file
for a new group, modify the destfile.txt and modify the loop.sh to
reflect the new configuration. Finally, run prep.sh and loop.sh
Make sure you don’t have any active stream using the client pis that you are reconfiguring
If you are planning to have the vizwall up 24x7, I would suggest moving the video to tmpfs/ramfs partition because ffmpeg will perform a lot of read operations reducing the lifespan of your memory cards. I have moved a couple of locations to ramfs:
tmpfs /var/log tmpfs defaults,noatime,nosuid,nodev,noexec,mode=0755,size=10m 0 0
tmpfs /home/pi/videos tmpfs defaults,noatime,nosuid,nodev,noexec,mode=0777,size=400m	0	0
I keep all my video in /home/pi/videos but if your videos are longer then
try plugging in a USB drive instead of keeping video on memory card.
Mohit Sharma
Senior Infrastructure Engineer
DevOps Engineer with 10+ years of experience automating and scaling mission-critical systems. Proven expertise in Kubernetes, AWS, and Linux, with a strong focus on reducing operational complexity, enhancing developer experience, and fostering cross-functional collaboration. A track record of driving infrastructure automation, mentoring teams, and implementing best practices to deliver resilient, highly available systems.